By Olivier Dulaurent and Marvin Faure
There are two essential qualities required to ride in the mountains: aerobic endurance and strength endurance. The first is the ability to keep going for a long time (expect anything up to 12 hours to finish the 175km and 5,000m of climbing of an event like the Marmotte), while the second is the ability to keep climbing, hour after hour.
There’s no particular difficulty in building aerobic endurance on the plain, and no need for a complicated training programme. Some coaches might try to convince you otherwise, but all you really have to do is to build up your long rides progressively until you can manage 8, 10 or even 12 hours. This will take time: if you are new to cycling it might take two years or more. There are no short cuts. Be patient and do the work!
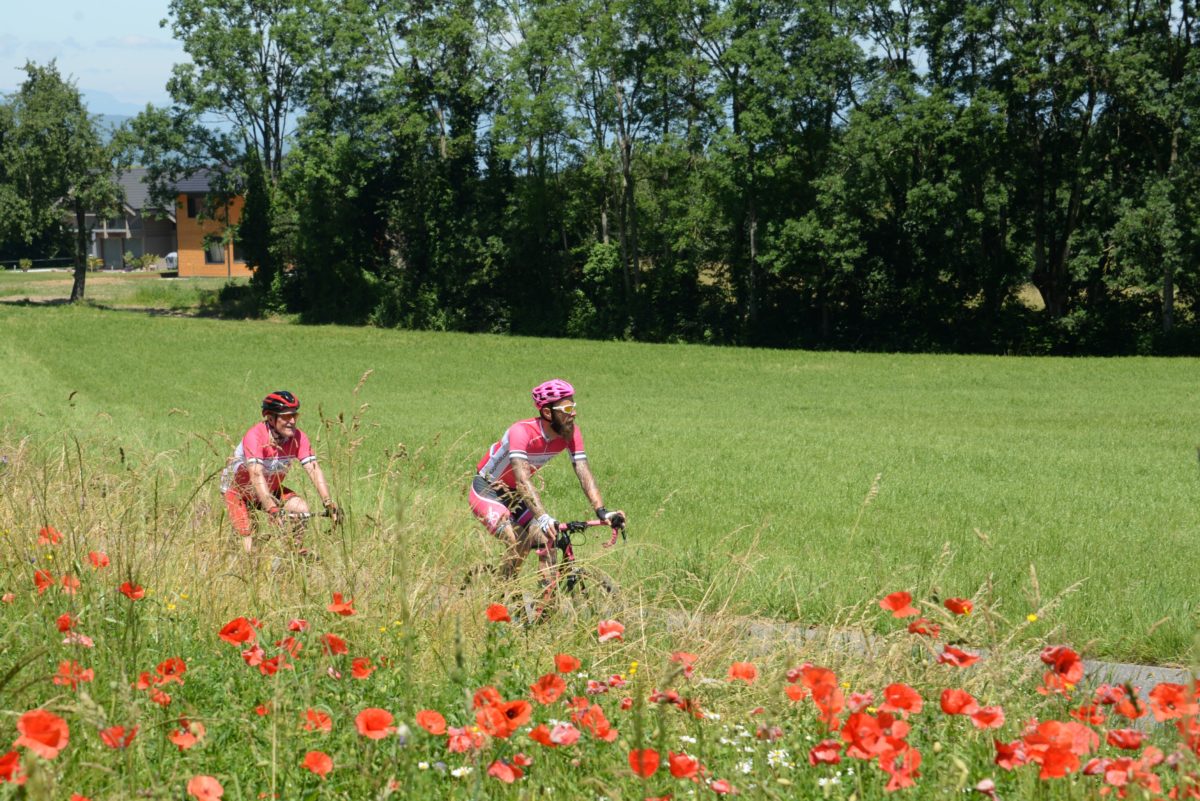
Developing strength endurance on the plain is another matter. It’s not easy in flat country to simulate the physical effort and pedal stroke required to climb continuously for one hour, let alone the five to eight hours of climbing you can expect at the Marmotte.
Your only option is to spend a good part of your training time specifically targeting strength endurance.
How to develop strength endurance on the plain
1. USE THE WIND
The time-honoured technique is to use the wind. This can work well in flat areas where the wind is both strong and steady. Forget your normal aero position and sit up straight as if you were climbing. This not only puts you in the right position, but also maximises the wind resistance. Choose a gear that results in a cadence around 45-55rpm and pedal (or “grind”) steadily into the wind.
Do most of these rides at endurance pace, in upper Zone 2.
Once a week or so, do an interval session of several 10 to 15 minute efforts at around your anaerobic threshold (upper Zone 4). Remember the whole point of this exercise is to develop strength endurance so your cadence must remain below 55rpm, which for most people requires a strong headwind at threshold power.
2. USE ANY SLOPE YOU CAN FIND
Even in flat areas one can usually find a kilometre or so at a slight positive gradient. In other areas there may be a choice of short climbs. It’s best to find a climb in the 5-7% range and avoid short, sharp climbs with gradients above 10%.
Choose the gear combination that enables you to ride the climb at 45-55rpm at the desired intensity, and repeat as often as needed to accumulate the desired time.
3. RIDE SOLO
Riding behind someone else in flat country is never going to develop your strength endurance. Ideally you should ride solo. If it’s important for you to ride with others, either agree with them that you are going to lead the whole ride, or that you will ride well behind the group so that you are not drafting.
4. GO FIND SOME HILLS
If there are no hills near you and no wind, perhaps you should take the car (or better still the train) from time to time to go to a more suitable spot. Any hills are better than none at all…
The best of all, of course, is to join a training camp in the mountains.
5. USE A TURBO TRAINER
A turbo trainer does a pretty good job of simulating a climb, because the resistance is relentless and you can’t freewheel. Set your front wheel up on a block, put your favourite music on and you are ready to go. (See below for more on the set-up).
Vary the stimulation by doing some long, steady-state climbs in Zone 2 and, on other days, shorter interval-based efforts in Zone 3 and Zone 4. Vary the cadence: early in the season do most of the sessions at low cadence (45-55rpm) specifically to target strength endurance; as you get closer to the event, do some sessions at high cadence (90 rpm and above) and others at the cadence you would use during the event.
At low cadence you will be pushing hard on the pedals: engage your glutes by putting your hands in the drops, tilting your pelvis forward and keeping your heels down throughout the stroke.
Pay careful attention to your pedal stroke, making it as fluid and circular as possible. To confirm this, listen to the sound from your turbo: it should be constant and smooth. If your power meter allows, look at the Torque Effectiveness numbers and try to keep them as close as possible to 100%.
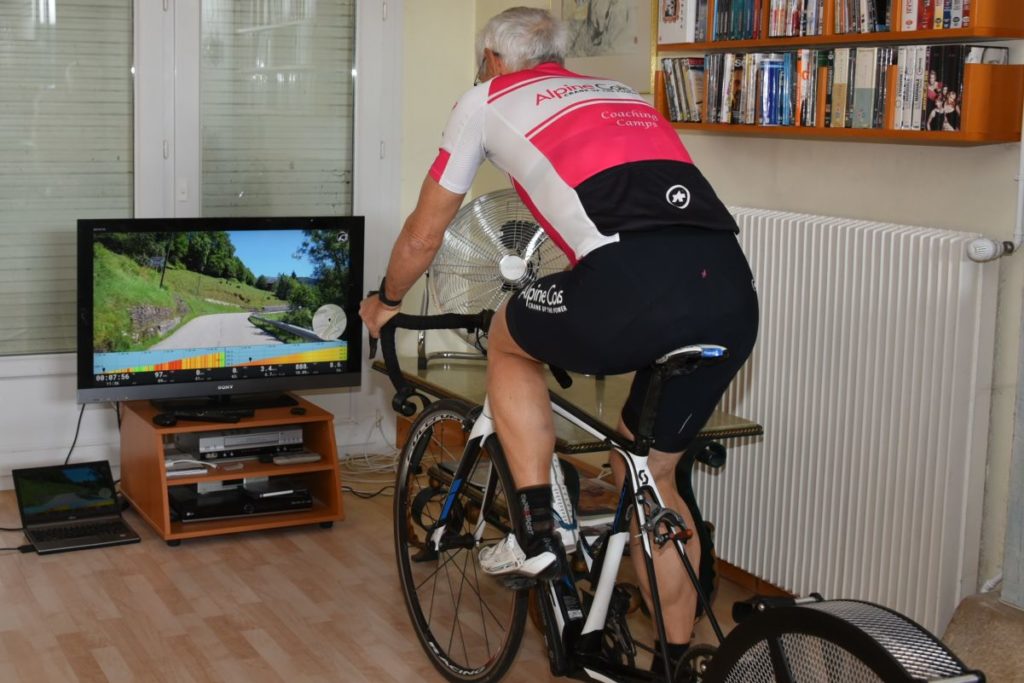
TURBO SET-UP
You don’t need either a smart trainer or a power meter, although both are useful. So long as you have the means to recreate your position on your road bike on your turbo set-up and vary the resistance while pedalling you can have a good workout. On a “dumb” trainer and without a power meter you will have to determine your intensity zone either by feel or by using a heart rate monitor, bearing in mind that your heart rate will always lag your effort level by several minutes.
If money is no object, the ideal set-up is to use your regular road bike on a recent direct-drive smart trainer. When connected to a virtual reality (VR) system like BigRingVR, Rouvy or BKool, you can watch high definition video of hundreds of different climbs around the world synchronised to the speed at which you are climbing. The software changes the resistance according to the slope, the power you are putting out and your body weight, providing a reasonably realistic experience. The only thing missing is lateral movement: on most turbo trainers you cannot rock the bike from side to side, which means pedalling standing up feels unnatural.
If you don’t have a smart trainer you can still use the same VR systems, so long as you have a power meter on your bike. In this case it is up to you to set the desired resistance. On some turbo trainers you do this by changing gear; on others you can adjust the resistance directly with a control. You can still watch the video while “climbing”; the software will calculate your speed from your power, your weight and the slope and adjust the speed of the video accordingly.
No matter what set-up you have, the experience will be more realistic if you can raise the front of your bike. Since your bike’s wheelbase is approximately one metre, raise the front wheel by five centimetres to simulate a 5% gradient, or by seven centimetres for a 7% gradient.